

I have been strugling with this one for a while and finally was astonished by the simplicity of the solution.
The problem
Let’s talk about provisioning virtual desktops with Citrix Cloud (Virtual Apps and Desktops Service) with Amazon Web Services as a public cloud to host the virtual machines. The goal is to provision Windows 10 VMs with Citrix MCS on AWS Dedicated Hosts and consolidate the amount of these.
Then, there are 2 solutions, either you reserve the number of Dedicated Hosts needed for 1 or 3 years or you choose to go On-Demand. I will bring you more visibility on how to calculate your best option in another post soon.
Let’s take the On-Demand option. You can manually launch the number of Dedicated Hosts you need to run your 100 Desktops. But it will be a waste of money if you run only 30% of your VMs. Worse, it will be a huge waste of money if all of your VMs are turned off! You will pay your Dedicated Hosts for watching the grass grow. That’s not what we can call cost efficiency right?
So here is what you should do to avoid a sweaty conversation with your FinOps or your Cost Controller… Use an AWS Host resource group! It enables the AWS License Manager to manage your Dedicated Hosts. It will allocate, release, and recover your Dedicated Hosts when needed. So you can have your 100 Virtual Desktops all turned off, the License Manager will release all of your Dedicated Hosts. Therefore, you won’t pay an extra dime for the EC2 Dedicated Host cost, only for the Elastic Block Storage (EBS) used by your Virtual Desktops.
Long story short, as of today (Jan 25 2021), you can’t provision Virtual Desktops natively with the Citrix Cloud GUI on AWS Dedicated Hosts managed in a Host resource group.
…But! If you’re still reading this, it means you want the solution, right?
The good news
The good news is that you can do it doing 3 things:
- Create a Host resource group in AWS. Find the AMI ID of your master image uploaded to AWS
- Create your Machine catalog with Powershell (New-AcctIdentityPool ; New-ProvScheme ; New-BrokerCatalog)
- Find the AMI ID of the volume prepared at the New-ProvScheme step
Enough talks, let’s get our hands dirty.
Disclaimer: It’s obvious that you should not run actions from someone you don’t know and who doesn’t know your environment. So please, try in a safe environment (=Not in Prod) first.
Creation of the Host resource group in AWS
First. You have to go to the AWS License Manager from the list of AWS Services. Create a Customer managed licenses. Select the type of licenses number and the amount of your needs. In my case, I selected the license type Core and a number of 480. So each time an M5 Dedicated Host turn on, it will grab 48 licenses (the number of expected M5.Large VMs I will run on).
Second. Create the Host resource group. Select the settings you would like your Host resource group to perform. In my case, I selected : Allocate hosts automatically ; Release hosts automatically ; Recover hosts automatically.And the instance family (optional) that can be launched in my Host resource group : M5. Then associate the license configuration created just above.
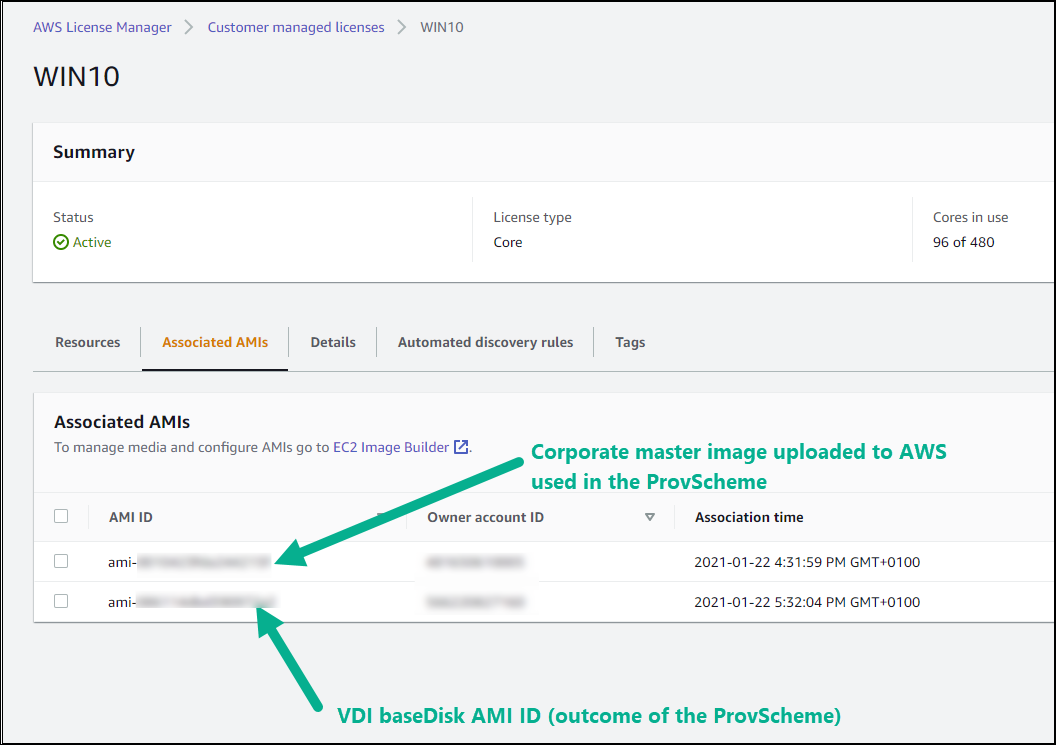
Then, add the AMI ID of the master image you uploaded to AWS to the Associated AMIs in your AWS License Manager

Creation of the Machine Catalog with Powershell
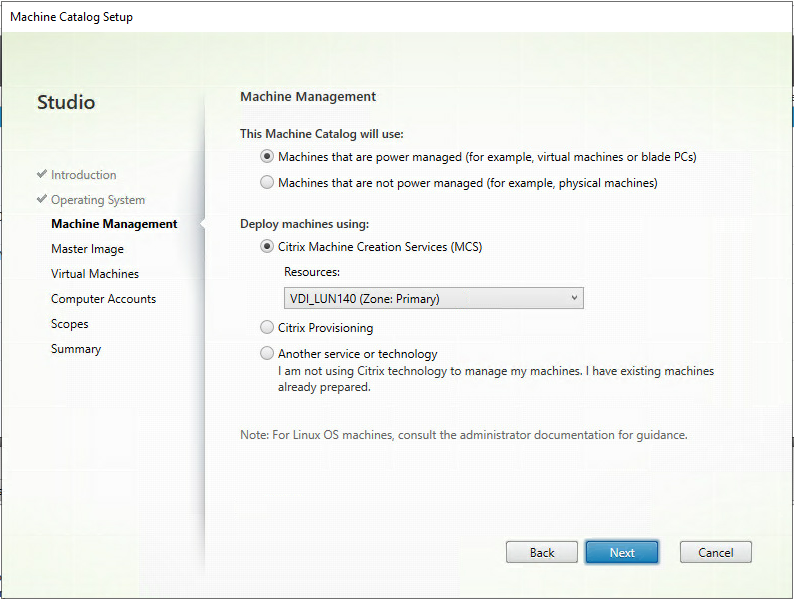
If, like me, you are using Citrix Cloud ❤️, you will have to install the “XenApp and XenDesktop Remote PowerShell SDK” and create your Machine Catalog like so:
The creation of the Machine Catalog is, in fact, the addition of 3 tasks:
1. Creation of the Account Identity Pool (New-AcctIdentityPool)
New-AcctIdentityPool -AdminAddress "YourCloudAccount.cloud.com:443" -AllowUnicode -Domain "yourdomain.whatever" -IdentityPoolName "YourMachineCatalogName" -NamingScheme "AWSDESKTOP#####" -NamingSchemeType "Numeric" -OU "OU=AWS-Desktops,DC=yourdomain,DC=whatever" -Scope @() -ZoneUid "YourZoneUid"New-AcctIdentityPool (creation of the Machine naming scheme and AD)
In order to get your ZoneUid, check what is the ZoneUid from another BrokerCatalog in the same AWS region. More info on the Get-BrokerCatalog.
2. Creation of the Provisioning scheme (dedicated and persistent VMs) (New-ProvScheme)
$ProvSchemeTaskID = New-ProvScheme -AdminAddress "YourCloudAccount.cloud.com:443" -CustomProperties "<CustomProperties xmlns=`"http://schemas.citrix.com/2014/xd/machinecreation`" xmlns:xsi=`"http://www.w3.org/2001/XMLSchema-instance`"><Property xsi:type=`"StringProperty`" Name=`"UseManagedDisks`" Value=`"true`" /><Property xsi:type=`"StringProperty`" Name=`"ManagedDisksPreview`" Value=`"false`" /></CustomProperties>" -DedicatedTenancy -TenancyType "Host" -HostingUnitName "YourResourceName" -IdentityPoolName "YourMachineCatalogName" -InitialBatchSizeHint 1 -MasterImageVM "XDHyp:\HostingUnits\YourResourceName\windows_10-En-Full_20210116-x86_64 (ami-0012345abc123456a).template" -RunAsynchronously -Scope @() -SecurityGroup @("xdhyp:\HostingUnits\YourResourceName\Your Security Group Name.securitygroup") -ProvisioningSchemeName "YourMachineCatalogName" -ServiceOffering "xdhyp:\HostingUnits\YourResourceName\M5 Large Instance.serviceoffering"This is the most interesting part, as it interacts directly with AWS. You will see some activity in the AWS EC2 Instances and EBS Volumes. The New-ProvScheme action takes usually 20 minutes to complete. Note that I choose the M5 Large instance size to stick with the M5 family I’ve set in the Host resource group.
In order to check the status of the task (Get-ProvTask):
Get-ProvTask -taskid $ProvSchemeTaskIDLike I said, the WorflowStatus should be in a”Running” state for around 20 minutes. Wait until the WorflowStatus is “Completed”. Status must “Finished”. TerminatingError must be empty.
Once completed, go to your AWS EC2 Dashboard, in your AMIs. You should see a new AMI created. The name starts with YourMachineCatalogName.
Note the AMI ID and associate it in your AWS License Manager, see screenshot in section 1. You should now have 2 AMIs associated.
3. Creation of the Broker Catalog (New-Brokercatalog)
$ProvisioningSchemeUid = (get-provtask -taskid $provSchemeTaskID).ProvisioningSchemeUid.Guid New-BrokerCatalog -AllocationType "Permanent" -IsRemotePC $False -AdminAddress "YourCloudAccount.cloud.com:443" -MinimumFunctionalLevel "L7_20" -Name "YourMachineCatalogName" -PersistUserChanges "OnLocal" -ProvisioningType "MCS" -Scope @() -SessionSupport "SingleSession" -ZoneUid "YourZoneUid" -ProvisioningSchemeId $ProvisioningSchemeUidOnce completed, you will see the new Machine Catalog in your Web Studio!
You will be able to provision new Desktops from the GUI only if you associated the new AMI ID created at the New-ProvScheme step.
Configuration part completed! Now let’s play turning the machines on and off and check how it works with the Dedicated Hosts allocation and release.
Let’s turn on some of new instances created.

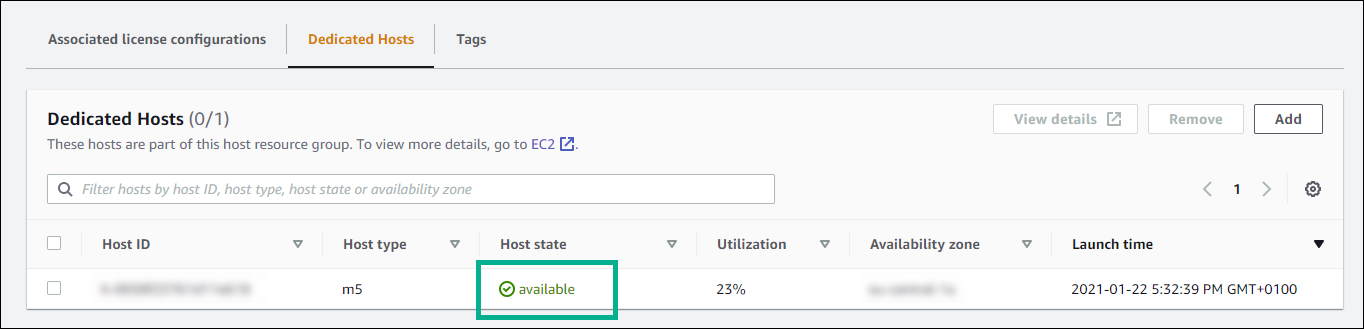
Now let’s turn off the instances.


I’ve informed Citrix about this as it’s not documented yet and is not natively running with the Web Studio. I’m sure this will be part of an enhancement request and be released in a couple of sprints. Citrix’s Jill Fetscher will also release an article on this. In the meantime, you got mine.
Should you want to read a well written guide on creating MCS Catalogs with PowerShell for on-prem environments, follow this link!
That’s all folks! I hope you had as much fun as I had troubleshooting this.